Running a Bert Model on an iPhone
During our recent Engineering Development Days, a three-day event where we paused regular work to focus on personal growth, I set myself one goal: take a large pre-trained BERT model built for GPU-heavy environments and get it running on an iPhone. I’d never worked with BERT models, Core ML or mobile deployment before, so most of the three days was spent finding out what I didn’t know.
The Challenge: Bringing a Data Center Model to Mobile
Our team has recently built a text classification API that categorises inputs
into labels such as condition, constraint, notice, and process. The
engine behind this API was a BERT-large model. BERT-large has 24 transformer
layers, a hidden size of 1024, 16 attention heads, and an intermediate layer
size of 4096. Those numbers are why it’s good at the task, and also why it’s
expensive to run.
What each of them means, briefly: the 24 transformer layers are the depth of the model, each one learning more complex linguistic patterns than the last. The hidden size of 1024 is the dimensionality of the vector representations inside the model, which is how much room there is to encode word meanings and context. The 16 attention heads in each layer let the model focus on different parts of the input text at once when processing a word, so it can pick up more relationships between them. The intermediate size of 4096 is the internal feed-forward network inside each transformer layer, which is where most of the transformation of what the attention mechanism learned happens.
Initially, our focus was on GPU deployments. However, practical constraints meant that the API might sometimes have to run in CPU-only environments. I had profiled the API on my MacBook using only its CPU, and while the performance was acceptable, I wondered if I could take this even further. An iPhone has far less to work with than a data center, so it seemed like a good place to find the limit.
Converting the Model: From BERT to Core ML
The first step was converting the BERT model for mobile deployment. Modern phones have capable GPUs, but you’re still working against a battery and a storage budget, so every megabyte and every millisecond counts. I tried two approaches:
Direct Conversion via ONNX:
- I started by converting the pre-trained BERT model into the ONNX (Open Neural Network Exchange) format. ONNX is an interchange format that sits between different machine learning frameworks.
- Using Apple’s coremltools, I then converted the ONNX model into Core ML format. The conversion was successful, and the resulting model was around 670.1 MB in size.
- This version performed reasonably well on the iPhone, which surprised me; I’d assumed a straight conversion of a model this size wouldn’t be usable at all.
Model Distillation and Optimisation:
- Knowing that 670.1 MB was still relatively bulky for an ideal mobile experience, I experimented with model distillation. The idea behind distillation is to transfer the knowledge from a large model to a smaller one; options like MobileBERT or DistilBERT came into play.
- Despite facing some challenges, including Python library incompatibilities that needed careful resolution, I managed to reduce the model size further to 134 MB (pre quantisation).
- Although this distilled model showed promise in terms of efficiency, its accuracy was a bit less reliable compared to the full sized version, a reminder that reducing model size often comes with trade offs.
The Details
Model Architecture and Specifications
- BERT-large Details:
- Layers: 24 transformer layers.
- Hidden Size: 1024.
- Attention Heads: 16 per layer.
- Intermediate Size: 4096.
- Vocabulary: 30,522 tokens.
- Sequence Length: Supports sequences up to 512 tokens.
That’s a lot of model to move onto a phone, and it’s what made the conversion and optimisation awkward.
Conversion Process
ONNX as a Bridge: Core ML tools won’t read a PyTorch model directly, so ONNX is the step in between. Export to ONNX, then convert ONNX to Core ML.
Core ML Conversion: coremltools handled the second half. The converted model still gave the same predictions as the original, which was the main thing I wanted to check.
Optimisation Techniques
Distillation: Training a smaller model to mimic the outputs of the full-scale BERT-large took the size from 670.1 MB down to 134 MB. That’s what made it a realistic thing to ship on a phone, at some cost to accuracy.
Quantisation (On the Horizon): While I didn’t finalise the quantisation process during the event due to technical hurdles, it remains a promising technique for further reducing the model’s footprint and potentially increasing its inference speed on mobile devices.
The Knowledge Distillation Pipeline
To prepare the data for distilling the larger BERT model into a smaller one, I
wrote a Python script on top of torch and the transformers library. A full
walkthrough would be its own post, but a few parts of the data preparation are
worth showing.
Data Loading and Preprocessing
The script begins by loading the training data from a CSV file using pandas.
The label column arrives named either 'label_id' or 'label id' depending on
where the file came from, so it handles both. I also filtered out rows with
missing or invalid labels.
import pandas as pd
# ... other imports ...

class DistillationDatasetPreparator:
    def __init__(self, csv_path, ...):
        # ... initialization ...

    def load_and_preprocess_data(self):
        df = pd.read_csv(self.csv_path)
        # Handling potential variations in label column names
        if "label_id" in df.columns:
            id_column = "label_id"
        elif "label id" in df.columns:
            id_column = "label id"
        else:
            id_column = None

        # Filtering out invalid labels
        if id_column and id_column in df.columns:
            filtered_df = df[df[id_column] != -1].copy()
            filtered_df = filtered_df[filtered_df["label"].notna()].copy()
        # ... rest of the loading and preprocessing logic ...
        return texts, labels
Data Augmentation
To help the distilled model generalise, I added two augmentation methods: synonym replacement and random deletion. Both introduce small variations in the training data, so the student model has to learn features that survive the wording changing.
    def augment_data(self, texts, labels, augmentation_factor=2):
        augmented_texts = texts.copy()
        augmented_labels = labels.copy()
        for idx, (text, label) in enumerate(zip(texts, labels)):
            for _ in range(augmentation_factor):
                technique = random.choice(["synonym_replacement", "random_deletion"])
                if technique == "synonym_replacement":
                    augmented_text = self._synonym_replacement(text)
                else:
                    augmented_text = self._random_deletion(text)
                augmented_texts.append(augmented_text)
                augmented_labels.append(label)
        return augmented_texts, augmented_labels

    def _synonym_replacement(self, text, replace_prob=0.2):
        # Uses NLTK's WordNet to find synonyms and replace words
        words = text.split()
        # ... logic for finding and replacing synonyms ...
        return " ".join(words)

    def _random_deletion(self, text, delete_prob=0.1):
        # Randomly deletes words from the text
        words = text.split()
        # ... logic for randomly deleting words ...
        return " ".join(words)
Tokenization with transformers
The script uses BertTokenizer from the transformers library to convert the
text into the numerical representation the model reads. The teacher and student
models have to tokenise identically, or the soft labels won’t line up with what
the student sees.
from transformers import BertTokenizer

    def tokenize_dataset(self, texts, labels):
        tokenizer = BertTokenizer.from_pretrained(self.teacher_model_name)
        encodings = tokenizer(
            texts,
            truncation=True,
            padding="max_length",
            max_length=self.max_length,
            return_tensors="pt",
        )
        input_ids = encodings["input_ids"]
        attention_masks = encodings["attention_mask"]
        labels_tensor = torch.tensor(labels)
        return input_ids, attention_masks, labels_tensor
Generating Soft Labels from the Teacher Model
The core idea of knowledge distillation involves transferring the “knowledge” of the teacher model (BERT-large in our case) to the student model. This is achieved by training the student not only on the hard labels but also on the probability distributions (soft labels) predicted by the teacher. This script includes functionality to load the pre-trained teacher model and generate these soft labels for the training data.
from transformers import BertForSequenceClassification
import torch.nn.functional as F

    def generate_soft_labels(self, input_ids, attention_masks, teacher_model_path=None):
        # Load the teacher model
        teacher_model = BertForSequenceClassification.from_pretrained(teacher_model_path or self.teacher_model_name)
        device = torch.device("cuda" if torch.cuda.is_available() else "cpu")
        teacher_model.to(device).eval()

        # Generate predictions (logits) and then soft labels (probabilities)
        dataloader = DataLoader(TensorDataset(input_ids, attention_masks), batch_size=self.batch_size)
        soft_labels = []
        with torch.no_grad():
            for batch in dataloader:
                batch_input_ids, batch_attention_masks = tuple(t.to(device) for t in batch)
                outputs = teacher_model(input_ids=batch_input_ids, attention_mask=batch_attention_masks)
                logits = outputs.logits
                probs = F.softmax(logits, dim=1)
                soft_labels.append(probs.cpu())
        return torch.cat(soft_labels, dim=0)
That gives the student model both the correct labels and the teacher’s probability distribution over all of them, which is the extra signal distillation runs on.
From Model to Mobile: Implementing BERT on iOS
With the distilled BERT model converted to Core ML, the next step was to build an iPhone application to run it. This section highlights some key aspects of the iOS app development using Swift and the Core ML framework.
SwiftUI for the User Interface
The application’s user interface was built using SwiftUI, Apple’s modern declarative UI framework. This allowed for a relatively quick and efficient way to create the basic elements needed for text input and displaying the classification results.
import SwiftUI

@main
struct auto_taggerApp: App {
    var body: some Scene {
        WindowGroup {
            ContentView()
        }
    }
}
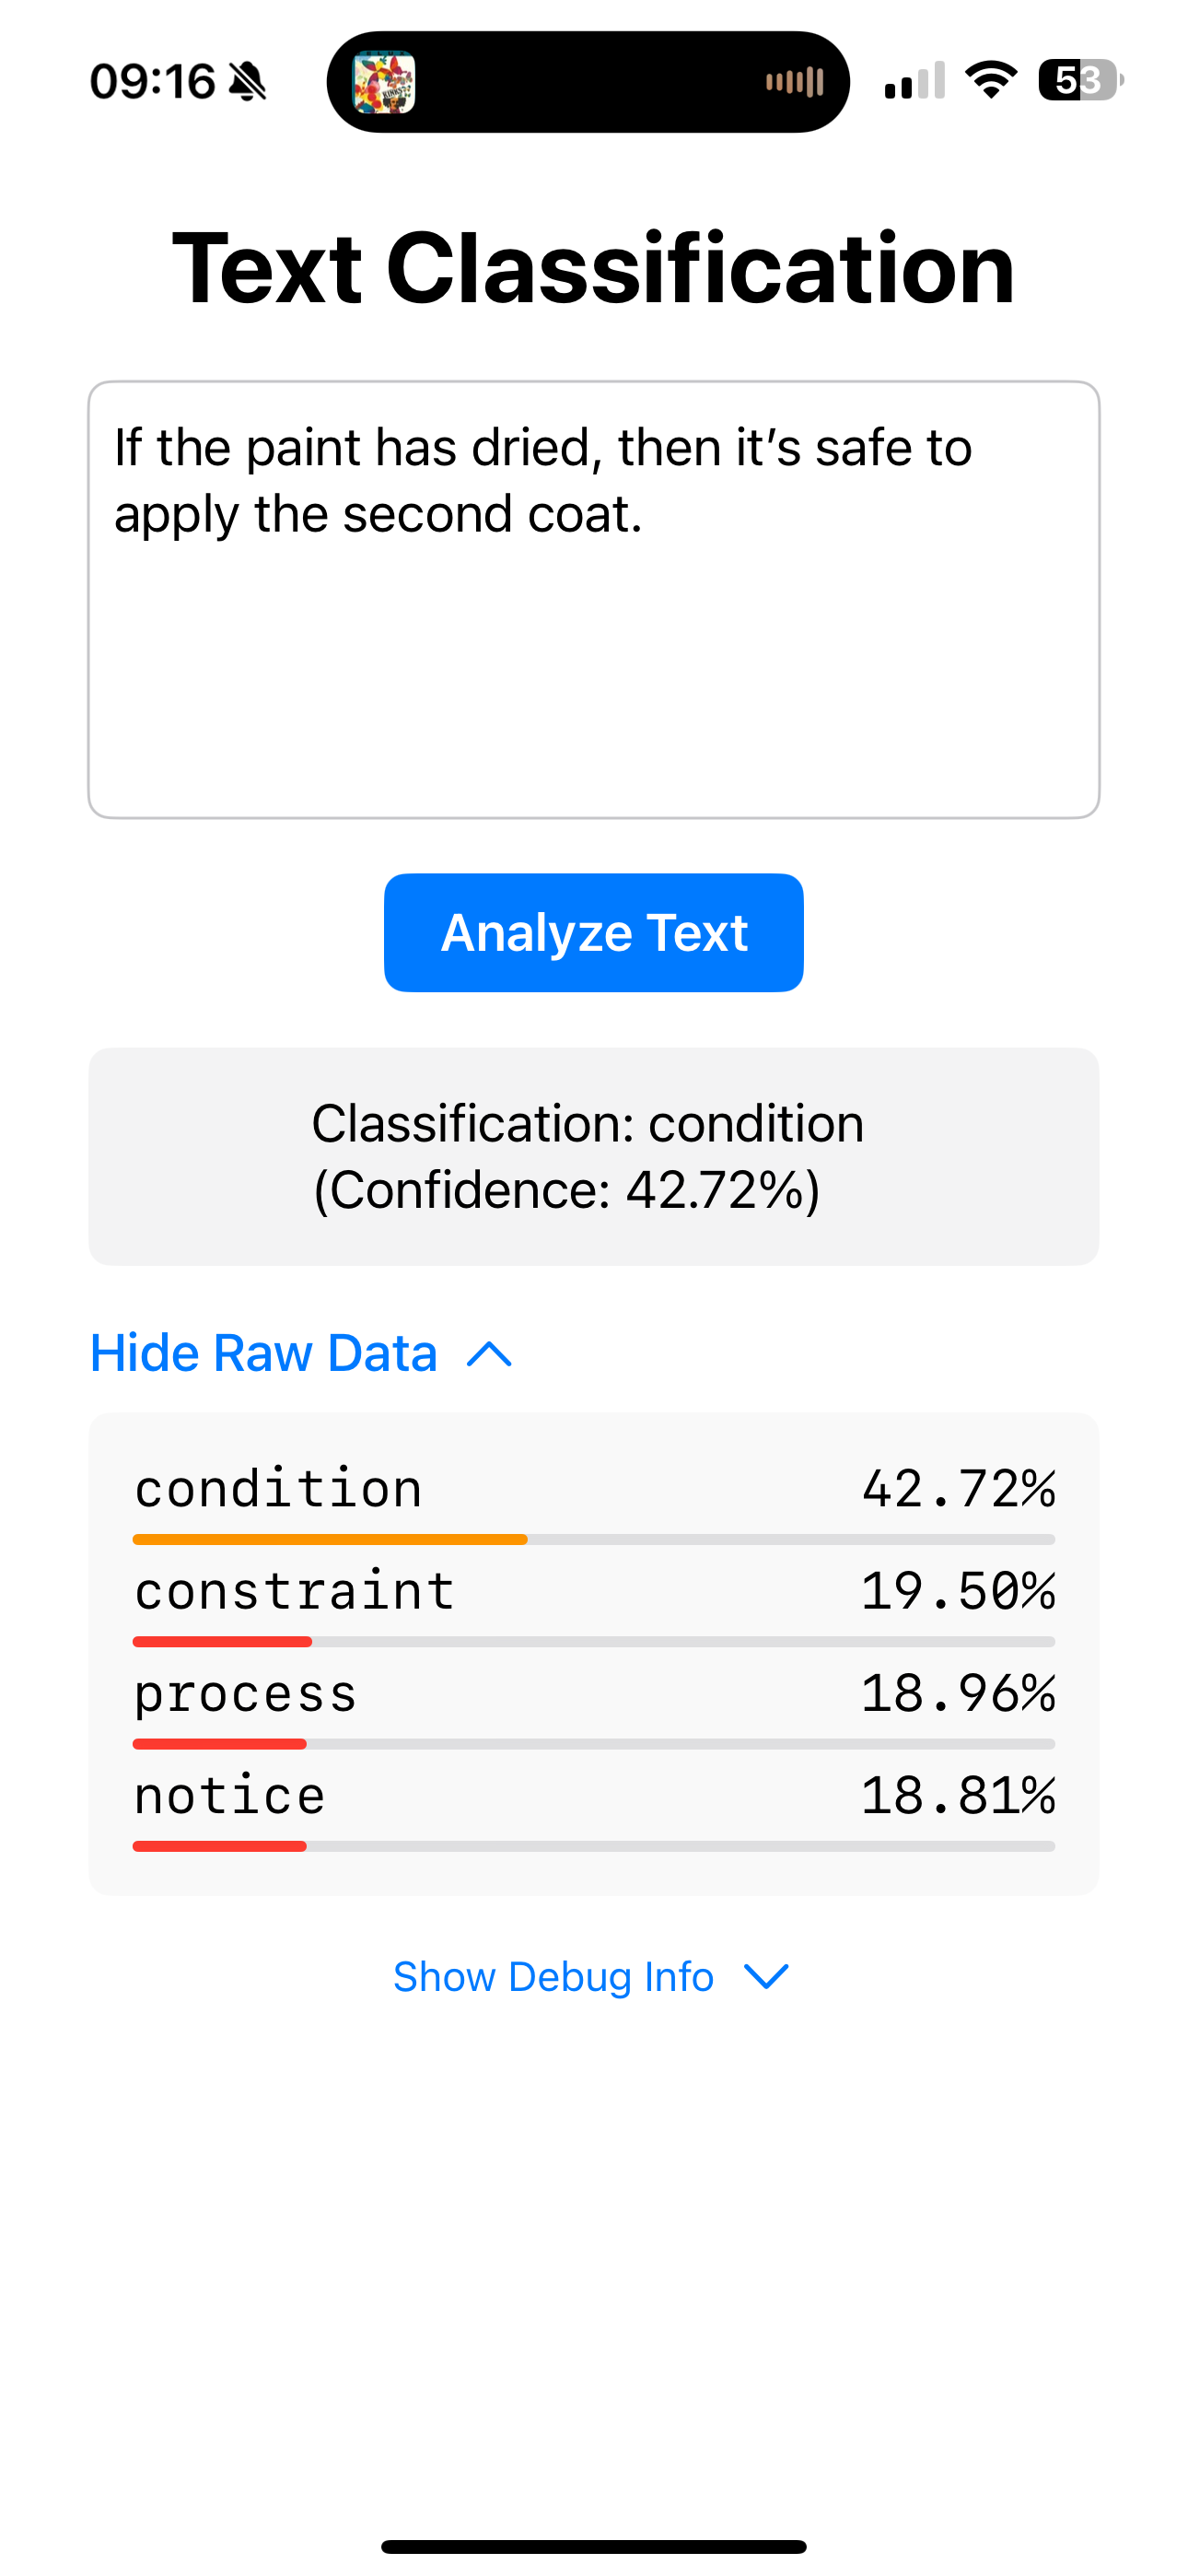
The ContentView struct houses the main UI elements, including a TextEditor
for the user to input text and a button to trigger the analysis. The results are
then displayed below.
The screenshot below gives an example of the app’s interface with a classified
text result:
A Custom BERT Tokenizer in Swift
The app needed its own BERTTokenizer. The standard iOS tokenizers don’t know
about BERT’s vocabulary or its tokenisation rules, so there was nothing to
reuse.
class BERTTokenizer {
    private let vocabulary: [String: Int]
    private let unkToken = "[UNK]"
    private let clsToken = "[CLS]"
    private let sepToken = "[SEP]"
    private let padToken = "[PAD]"

    init() throws {
        guard let vocabURL = Bundle.main.url(forResource: "vocab", withExtension: "txt") else {
            throw TokenizerError.vocabNotFound
        }
        let vocabString = try String(contentsOf: vocabURL, encoding: .utf8)
        let tokens = vocabString.components(separatedBy: .newlines)
        // ... loading vocabulary into dictionary ...
    }

    func tokenize(text: String, maxLength: Int) throws -> TokenizedInput {
        var tokens = [clsToken]
        let words = text.components(separatedBy: .whitespacesAndNewlines)
        // ... basic whitespace tokenization ...
        tokens.append(sepToken)
        // ... converting tokens to IDs, padding, creating attention mask ...
    }
    // ... other methods and structs ...
}
This BERTTokenizer class is responsible for:
- Loading the Vocabulary: Reading the
vocab.txtfile (which was packaged with the app) into a dictionary. - Basic Tokenization: For this initial version, a basic whitespace tokenizer was implemented. For a production-ready application, a more sophisticated WordPiece tokenizer would be required to handle subwords correctly and match the original BERT training process more accurately.
- Handling Special Tokens: Adding
[CLS]at the beginning and[SEP]at the end of the sequence, as well as handling[UNK]for unknown words and[PAD]for padding. - Padding and Truncation: Ensuring all input sequences have a consistent length (in this case, 128 tokens) by padding shorter sequences and truncating longer ones.
- Generating the Attention Mask: Creating a mask to indicate which tokens are actual words and which are padding.
- Formatting as
MLMultiArray: Converting the token IDs and attention mask intoMLMultiArrayobjects, the required input format for Core ML.
Loading and Running the Core ML Model
The TextClassifier class handles the loading of the converted Core ML model
and the execution of the classification.
class TextClassifier {
    private let model: MLModel
    private let tokenizer: BERTTokenizer
    // ...

    init() throws {
        let mlModel = try distilled_model() // Loading the Core ML model
        model = mlModel.model
        tokenizer = try BERTTokenizer()
        // ... loading labels ...
    }

    func classify(text: String) throws -> ClassificationResult {
        let tokens = try tokenizer.tokenize(text: text, maxLength: 128)
        let inputFeatures = try MLDictionaryFeatureProvider(dictionary: [
            "input_ids": tokens.ids,
            "attention_mask": tokens.mask
        ])
        let prediction = try model.prediction(from: inputFeatures)
        // ... processing the prediction output (logits, softmax) ...
    }
    // ...
}
The classify function takes the input text, uses the BERTTokenizer to
prepare it, creates the necessary input features (input_ids and
attention_mask) for the Core ML model, and then runs the prediction. The
output logits from the model are then processed using a softmax function to
obtain probabilities for each class.
Displaying Results and Debug Information
The ContentView also handles displaying the classification results to the
user, including the predicted label and its confidence. There’s also a debug
mode that shows the raw output probabilities, which is how I checked the model
was behaving the same on device as it did on my laptop.
struct ContentView: View {
    @State private var inputText: String = ""
    @State private var resultText: String = "Classification result will appear here"
    @State private var classificationResults: [(label: String, value: Double)] = []
    @State private var showRawData: Bool = false
    // ...

    private func analyseText() {
        // ... background task to prevent UI freezing ...
        do {
            let result = try classifier?.classify(text: inputText)
            DispatchQueue.main.async {
                resultText = "Classification: \(result.label) (Confidence: \(String(format: "%.2f", result.confidence * 100))%)"
                classificationResults = result?.allProbabilities ?? []
            }
        } catch {
            // ... handle error ...
        }
    }

    // ... UI elements for text input, button, and result display ...
}
The app performs the analysis on a background thread to prevent the UI from freezing during the potentially computationally intensive task.
The Mobile Deployment Experience
Getting the converted model running on an iPhone Pro Max was the best part of the event. Two things stood out:
Real-Time Inference: The model classified text as fast as I could type it in, on a phone, with no network call involved. That’s the whole point of doing this on device.
Comparing Model Versions: The direct conversion model (670.1 MB) performed fine, and the distilled version (134 MB) was faster still. The smaller model was less accurate, though, and closing that gap would need more fine-tuning than three days allowed.
Lessons Learned and Challenges Overcome
Library and Dependency Management
Having spent some time away from Python, I was reminded of how friggin’ annoying it can be to manage library dependencies. The project required a specific set of libraries and versions to ensure compatibility with the ONNX and Core ML conversion processes. I encountered several issues related to version mismatches, which required careful management of my Python environment.
Balancing Accuracy and Efficiency
The trade-off between size and accuracy was the whole project in miniature. The distilled model is a fifth the size, and it’s not as accurate. I don’t think that’s fixable without more training time than I had.
Cross-Platform Development
Moving from a GPU-centric environment to a phone meant unlearning some habits. On a GPU you optimise for throughput; on a phone you’re optimising against storage, battery, and thermal limits, and those push you in different directions.
What I’d Do Next
I’m not extending this project for now, but the three days were worth it. The direct Core ML conversion was much easier than I expected, which says something about how far the tooling has come. The distillation work isn’t needed for anything I’m doing today, and I’d still reach for it first on the next on-device ML project.
The one thing I’d go back for is quantisation. I ran out of time before I finished it, and it should cut the model size and speed up inference again on top of what distillation already bought.
Conclusion
Three days took a BERT-large model from a data center API to real-time inference on an iPhone Pro Max, via ONNX, Core ML, and a distillation pass. Most of what I learned was about the constraints rather than the models, and about what you have to give up to fit inside a phone.
You can find the code for my repository at distilled-bert-ios.